
As the scorching summer sun draws us outdoors, there’s no denying the allure of cooling off with delicious treats. From ice creams and popsicles to sugary slushies, the options seem endless. However, as tempting as these sweet indulgences may be, it’s essential to keep our health in mind, especially during the hot summer months when staying hydrated and nourished is crucial. Embracing the concept of healthy summer treats not only ensures that we savor the season’s delights guilt-free but also provides us with an opportunity to relish the natural flavors and nutrients of the season’s bountiful produce. Let’s explore why it’s important to make summer treats healthy, striking the perfect balance between pleasure and nourishment in the season of sun-kissed adventures.
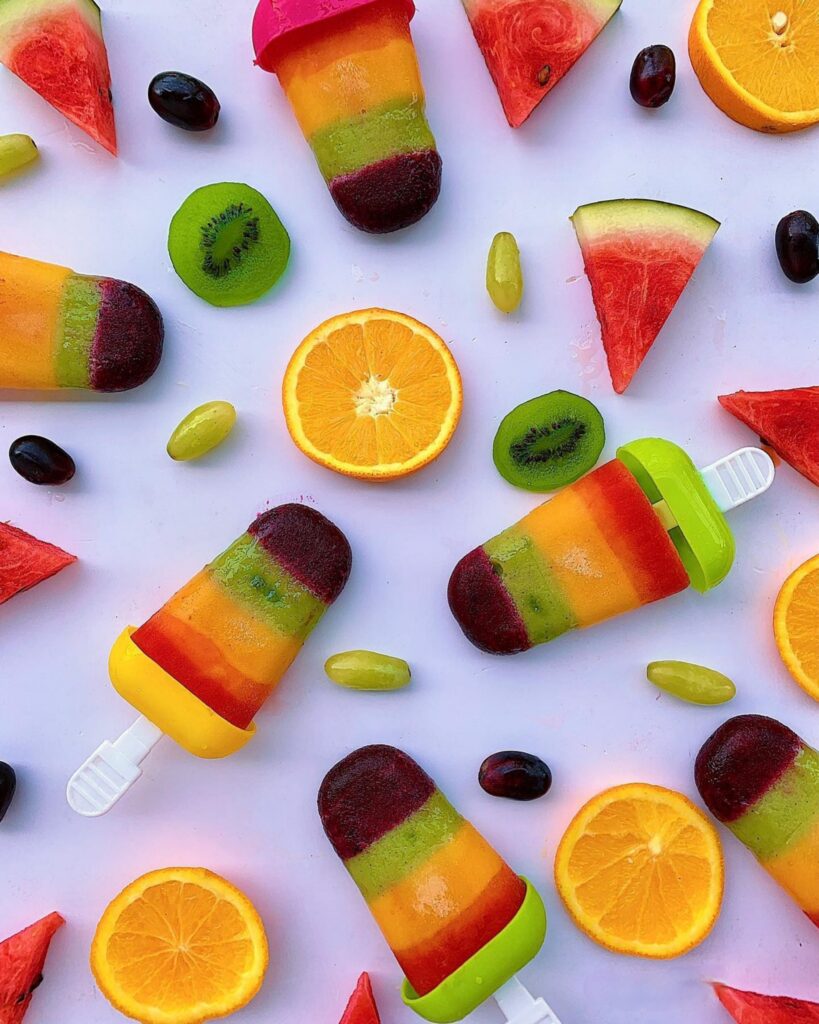
1. Frozen Fruit Popsicles:
Kickstart our list with a classic summer treat – popsicles! Ditch the store-bought sugar-laden options and make your own at home. Blend your favorite fruits like strawberries, blueberries, mangoes, or watermelon with yogurt or coconut water and freeze them in popsicle molds. These icy delights are packed with vitamins, antioxidants, and probiotics.
Frozen Fruit Popsicles Recipe
Ingredients:
- 2 cups mixed fresh fruits (strawberries, blueberries, mangoes, watermelon, etc.)
- 1 cup plain yogurt (Greek yogurt or dairy-free alternative for a vegan option)
- 1-2 tablespoons honey or maple syrup (adjust to taste)
- Popsicle molds
- Popsicle sticks
Instructions:
- Prepare the Fruits: Wash the fresh fruits thoroughly and remove any stems, seeds, or pits. Chop the fruits into small bite-sized pieces for easy blending.
- Blend the Fruits: In a blender, combine the chopped fruits with the plain yogurt. Blend until you have a smooth and creamy mixture. If you prefer some texture, you can leave a few chunks of fruits in the mix.
- Sweeten the Mixture: Taste the fruit and yogurt mixture and add honey or maple syrup to sweeten it according to your preference. Keep in mind that some fruits may be naturally sweeter than others, so adjust the sweetness accordingly.
- Fill the Popsicle Molds: Pour the fruit and yogurt mixture into the popsicle molds, leaving a little space at the top to accommodate the expansion during freezing. Tap the molds gently on the counter to remove any air bubbles.
- Insert the Popsicle Sticks: Carefully place the popsicle sticks into the center of each mold, making sure they are standing upright in the mixture.
- Freeze the Popsicles: Place the filled popsicle molds in the freezer and let them freeze for at least 4 to 6 hours, or preferably overnight. Make sure they are completely frozen before removing them from the molds.
- Unmold the Popsicles: To remove the frozen fruit popsicles from the molds, run the molds under warm water for a few seconds. This will help loosen the popsicles and make it easier to remove them.
- Enjoy the Healthy Treat: Serve the frozen fruit popsicles immediately, and enjoy these refreshing and nutritious summer treats!
Note: You can get creative with the fruits you use in this recipe. Feel free to use any combination of your favorite fruits like kiwi, peaches, raspberries, or pineapple. Additionally, you can experiment with different yogurt flavors or use coconut water for a dairy-free option. The possibilities are endless, so have fun and stay cool with these delightful frozen fruit popsicles!
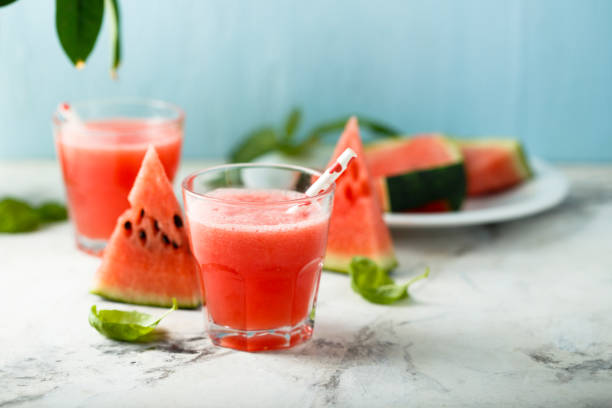
2. Watermelon Slushies:
Watermelon is the epitome of summer, and a watermelon slushie is a perfect way to beat the heat. Blend fresh watermelon chunks with ice and a squeeze of lime for a refreshing and hydrating drink that is low in calories and high in vitamins A and C.
Watermelon Slushies Recipe
Ingredients:
- 4 cups diced seedless watermelon (chilled)
- 1 cup ice cubes
- 1 tablespoon fresh lime juice
- 1-2 tablespoons honey or agave syrup (adjust to taste)
- Mint leaves (optional, for garnish)
Instructions:
- Chill the Watermelon: Wash and dice the seedless watermelon into small cubes. Place the diced watermelon in the refrigerator for at least 1-2 hours or until it is well chilled. Chilling the watermelon will make the slushie extra refreshing.
- Blend the Watermelon: In a blender, add the chilled diced watermelon and the ice cubes. Blend on high speed until you achieve a smooth and slushie-like consistency.
- Add Lime Juice: Squeeze the fresh lime juice into the blender with the watermelon slushie. The lime juice will enhance the flavor of the watermelon and add a zesty kick to the drink.
- Sweeten the Slushie: Taste the slushie and add honey or agave syrup to sweeten it to your liking. The amount of sweetener required will depend on the sweetness of your watermelon, so adjust accordingly.
- Blend Again: Once you’ve added the sweetener, blend the mixture again briefly to ensure everything is well combined.
- Serve the Watermelon Slushies: Pour the watermelon slushie into glasses and garnish with a few fresh mint leaves, if desired, for a burst of freshness and aroma.
- Enjoy the Refreshing Treat: Serve the watermelon slushies immediately while they are icy cold and at their most refreshing. Sip and savor the delightful flavors of summer!
Note: Feel free to customize this recipe according to your taste preferences. You can add a splash of coconut water for extra hydration and a subtle coconut flavor. Alternatively, a pinch of salt can enhance the overall taste of the slushie. For an adult twist, you can also add a splash of rum or vodka to create a refreshing watermelon cocktail. However, remember to enjoy responsibly if adding alcohol. Let your creativity flow and create your perfect watermelon slushie to beat the summer heat!
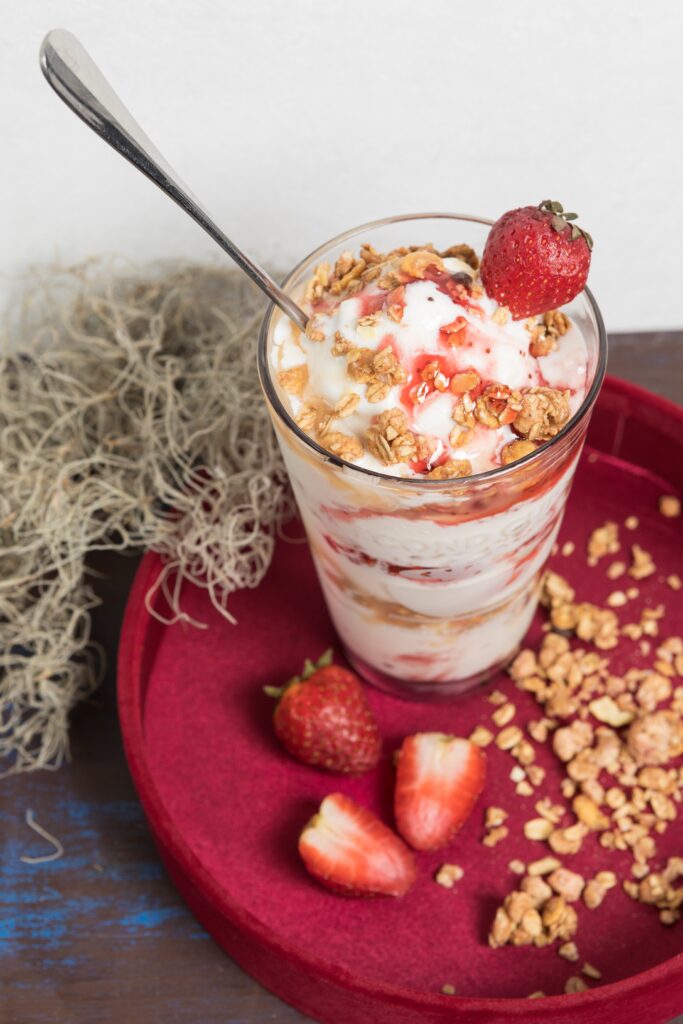
3. Greek Yogurt Parfait:
Indulge in a delightful and protein-packed Greek yogurt parfait. Layer your choose of Greek yogurt with your favorite fruits like berries, kiwi, and peaches, and add a sprinkle of delicious crunchy granola. This parfait is delicious and an excellent source of calcium and gut-friendly probiotics.
Greek Yogurt Parfait Recipe
Ingredients:
- 1 cup Greek yogurt (plain or flavored, like vanilla)
- 1 cup granola (you can use store-bought or homemade)
- 1 cup mixed fresh fruits (such as berries, sliced bananas, diced peaches, etc.)
- 1 tablespoon honey (optional, for added sweetness)
- 1/4 cup nuts (such as almonds, walnuts, or pistachios, chopped)
- Fresh mint leaves for garnish (optional)
Instructions:
- In a bowl, mix the Greek yogurt and honey (if using) until well combined. The honey is optional as Greek yogurt is already naturally tangy and sweet, so adjust the sweetness according to your preference.
- In a glass or parfait dish, start layering the ingredients. Begin with a layer of Greek yogurt at the bottom.
- Add a layer of granola on top of the yogurt. You can use any type of granola you like, or you can make your own by combining oats, nuts, seeds, honey, and a little oil, then baking until crispy.
- Next, add a layer of mixed fresh fruits on top of the granola. Feel free to mix and match fruits based on what’s in season or your personal preferences.
- Repeat the layers until you reach the top of the glass or dish. You can make as many layers as you like, but 2-3 layers usually work well.
- Finish the parfait with another dollop of Greek yogurt on top, a sprinkle of chopped nuts, and garnish with fresh mint leaves if desired.
- Serve immediately, or you can cover and refrigerate for a few hours to allow the flavors to meld together.
Enjoy your delicious and nutritious Greek yogurt parfait!
Variations:
- You can add a drizzle of maple syrup instead of honey for a different flavor profile.
- For a crunchy twist, you can include some chia seeds or flax seeds in the granola layers.
- To make it even more decadent, you can add a layer of dark chocolate chips or cocoa nibs between the yogurt and granola layers.
Feel free to get creative and tailor the parfait to your taste preferences and dietary needs!
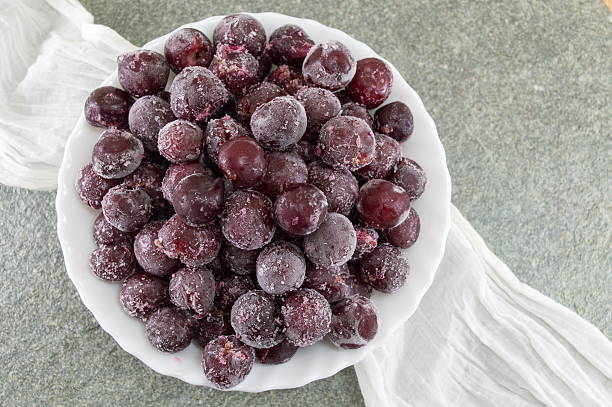
4. Frozen Grapes:
A simple yet satisfying treat, frozen grapes are a natural and wholesome way to cool down on a hot summer day. Pop some fresh grapes into the freezer for a few hours, and you have a sweet, icy snack rich in antioxidants and vitamin C.
Frozen Grape Recipe
Ingredients:
- Fresh grapes (seedless grapes work best)
- Water
Instructions:
- Wash the grapes thoroughly under cold running water to remove any dirt or residue.
- Pat the grapes dry gently with a paper towel or clean kitchen towel.
- Remove the grapes from their stems and place them in a colander.
- Rinse the grapes once again under water, ensuring they are clean.
- Allow the grapes to drain well in the colander to remove any excess water.
- Once the grapes are dry, transfer them to a baking sheet lined with parchment paper or a silicone baking mat. Ensure the grapes are spread out in a single layer on the sheet, with space between each grape.
- Place the baking sheet with the grapes in the freezer.
- Freeze the grapes for about 2-4 hours or until they are solid and firm.
- Once the grapes are frozen, transfer them to a freezer-safe container or resealable plastic bag for longer storage.
- Keep the frozen grapes in the freezer until you’re ready to enjoy them.
Note: Frozen grapes are best consumed within a few weeks to maintain their quality and taste.
Enjoy your delicious and healthy frozen grapes straight out of the freezer! They make a fantastic snack and a natural alternative to sugary frozen treats.
Variations:
- For an extra burst of flavor, you can try freezing different grape varieties like red, green, or black grapes.
- For an elegant touch, you can dip the frozen grapes in melted dark chocolate and let them set in the refrigerator before serving. This creates a delightful frozen chocolate-covered grape treat.
5. Coconut Chia Pudding:
Chia seeds are a nutritional powerhouse, and when combined with coconut milk, they create a creamy and delightful pudding. Mix chia seeds with coconut milk and honey or maple syrup for sweetness. Let it sit overnight in the fridge, and in the morning, you’ll have a delectable summer treat high in fiber, omega-3s, and essential minerals.
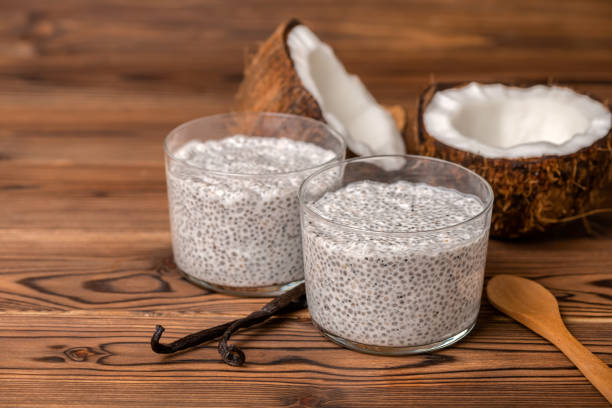
Coconut Chia Pudding Recipe
Ingredients:
- 1/4 cup chia seeds
- 1 cup coconut milk (canned or homemade coconut milk)
- 1-2 tablespoons sweetener of your choice (such as maple syrup, honey, agave syrup, or coconut sugar)
- 1/2 teaspoon vanilla extract
- Pinch of salt
- Optional toppings: shredded coconut, fresh berries, sliced fruits, chopped nuts, cocoa nibs, or a drizzle of honey
Instructions:
- In a mixing bowl, combine the chia seeds, coconut milk, sweetener, vanilla extract, and a pinch of salt. Stir well to ensure all the ingredients are evenly mixed.
- Let the mixture sit for about 5 minutes, then stir it again to prevent the chia seeds from clumping together. This step is essential to ensure a smooth and creamy texture.
- Cover the bowl with plastic wrap or a lid and refrigerate the mixture for at least 2-3 hours or overnight. The chia seeds will absorb the liquid and turn into a pudding-like consistency.
- After the chia pudding has set, give it a good stir to break up any clumps and to make it creamy.
- Taste the pudding and adjust the sweetness if needed by adding more sweetener to your liking.
- Spoon the coconut chia pudding into serving dishes or jars.
- Garnish with your favorite toppings, such as shredded coconut, fresh berries, sliced fruits, chopped nuts, cocoa nibs, or a drizzle of honey.
- Serve and enjoy the delicious coconut chia pudding immediately, or you can store any leftovers in the refrigerator for up to 3-4 days.
Feel free to experiment with different flavors and add-ins to customize your coconut chia pudding. You can mix in some cocoa powder for a chocolate version or add a splash of almond extract for an almond-coconut twist. The possibilities are endless!
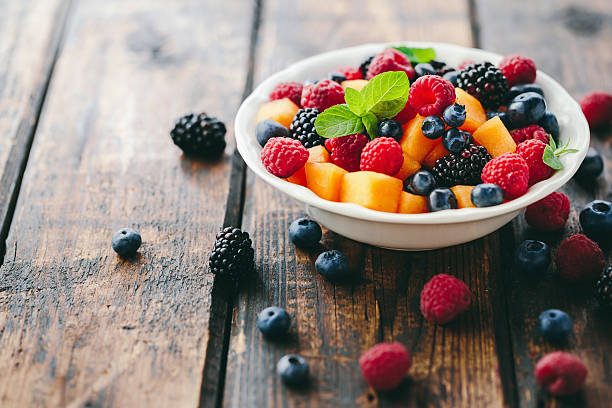
6. Fresh Fruit Salad:
Enjoy the abundant seasonal fruits and create a colorful fruit salad. Mix juicy watermelon, ripe peaches, tangy berries, and succulent pineapple. Fruits are naturally sweet and loaded with vitamins, fiber, and antioxidants – a guilt-free summer indulgence.
Fresh Fruit Salad Recipe
Ingredients:
- 2 cups strawberries, hulled and sliced
- 1 cup blueberries
- 1 cup green grapes, halved
- 1 cup cantaloupe, cubed
- 1 cup pineapple, cubed
- 1 cup watermelon, cubed
- 1 kiwi, peeled and sliced
- 1 banana, sliced
- 1 orange, peeled and segmented
- 1 tablespoon honey (optional, for a touch of sweetness)
- Fresh mint leaves for garnish (optional)
Instructions:
- Wash all the fruits thoroughly under cold running water. Pat them dry with a paper towel or clean kitchen towel.
- Prepare the fruits as needed: hull and slice the strawberries, halve the grapes, cube the cantaloupe, pineapple, and watermelon, peel and slice the kiwi and banana, and segment the orange.
- In a large mixing bowl, combine all the prepared fruits.
- If you prefer a sweeter fruit salad, you can drizzle a tablespoon of honey over the fruits. Gently toss the fruits with a spoon or spatula to coat them evenly with the honey.
- Transfer the fruit salad to a serving dish or individual serving bowls.
- Garnish with fresh mint leaves for a pop of color and added freshness.
- Serve the fresh fruit salad immediately, or you can cover and refrigerate it for a few hours before serving. Chilled fruit salad can be particularly refreshing on a hot day.
Enjoy your vibrant and delicious fresh fruit salad!
Variations:
- Feel free to customize the fruit salad based on your preferences and what’s in season. You can add or substitute fruits like raspberries, blackberries, mangoes, peaches, apples, or pears.
- For a tropical twist, you can sprinkle some shredded coconut over the fruit salad.
- A squeeze of lime or lemon juice can add a tangy flavor to the fruit salad.
- If you want to make it a bit more indulgent, you can top the fruit salad with a dollop of whipped cream or a scoop of vanilla ice cream.
7. Cucumber Mint Sorbet:
Sorbet is a quintessential summer treat, and this cucumber mint version adds a unique twist. Blend cucumbers, fresh mint leaves, lime juice, and honey for sweetness. Freeze the mixture until it sets, and you’ll have a cooling and hydrating sorbet perfect for a hot day.
Cucumber Mint Sorbet Recipe
Ingredients:
- 2 large cucumbers, peeled and chopped
- 1/2 cup fresh mint leaves
- 1/2 cup water
- 1/2 cup granulated sugar
- 2 tablespoons fresh lime or lemon juice
Instructions:
- In a small saucepan, combine the water and sugar. Heat over medium heat, stirring continuously until the sugar is completely dissolved. This will create a simple syrup.
- Remove the syrup from the heat and let it cool to room temperature.
- In a blender or food processor, add the chopped cucumbers, fresh mint leaves, and the cooled simple syrup.
- Blend the mixture until it becomes smooth and well combined.
- Add the fresh lime or lemon juice to the cucumber-mint mixture and blend briefly to incorporate it.
- Taste the mixture and adjust the sweetness or tanginess by adding more sugar or lime/lemon juice if needed.
- Pour the cucumber mint mixture into an ice cream maker and churn according to the manufacturer’s instructions. If you don’t have an ice cream maker, you can pour the mixture into a shallow dish and freeze it.
- If using an ice cream maker, the sorbet should be ready in about 20-30 minutes. If freezing the mixture in a dish, it will take around 3-4 hours to firm up.
- Once the sorbet has reached the desired consistency, transfer it to an airtight container and store it in the freezer until you’re ready to serve.
- Serve the cucumber mint sorbet in chilled bowls or cones. Garnish with a sprig of fresh mint if desired.
Enjoy the refreshing and unique taste of cucumber mint sorbet as a light and cooling dessert on warm days!
Note: If you don’t have an ice cream maker and prefer a smoother texture, you can take the sorbet out of the freezer every 30 minutes during the freezing process and stir it vigorously to break up any ice crystals until it reaches the desired consistency.
8. Avocado Chocolate Mousse:
If you’re a chocolate lover, this healthy avocado chocolate mousse is a must-try treat. Blend ripe avocados, cocoa powder, a splash of almond milk, and a drizzle of honey or agave for sweetness. Avocados have healthy fats, fiber, and essential nutrients, making this mousse nutritious and delicious.

Avocado Chocolate Mousse Recipe
Ingredients:
- 2 ripe avocados
- 1/4 cup unsweetened cocoa powder
- 1/4 cup maple syrup or honey (adjust to taste)
- 1 teaspoon vanilla extract
- 1/4 cup almond milk or any milk of your choice (add more for a thinner consistency)
- Pinch of salt
- Optional toppings: fresh berries, chopped nuts, coconut flakes, or a dollop of whipped cream
Instructions:
- Cut the avocados in half, remove the pits, and scoop the flesh into a blender or food processor.
- Add the cocoa powder, maple syrup or honey, vanilla extract, almond milk, and a pinch of salt to the blender with the avocados.
- Blend all the ingredients until you achieve a smooth and creamy mixture. Scrape down the sides of the blender or processor as needed to ensure everything is well combined.
- Taste the chocolate mousse and adjust the sweetness or chocolate flavor to your liking by adding more cocoa powder or sweetener if desired.
- Once you’re satisfied with the taste and texture, transfer the avocado chocolate mousse to serving dishes or dessert glasses.
- Chill the mousse in the refrigerator for at least 30 minutes before serving to allow it to firm up slightly.
- Just before serving, you can garnish the avocado chocolate mousse with fresh berries, chopped nuts, coconut flakes, or a dollop of whipped cream for an extra touch of flavor and presentation.
Enjoy your creamy and luscious avocado chocolate mousse!
Note: This avocado chocolate mousse is best served fresh. However, if you have leftovers, you can store them in an airtight container in the refrigerator for up to a day. The mousse may oxidize slightly and change color due to the avocado, but it should still taste delicious.
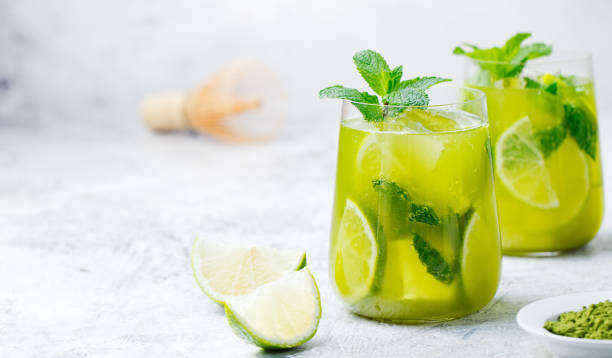
9. Iced Green Tea with Citrus:
Stay hydrated and refreshed with iced green tea infused with citrus slices. Green tea contains antioxidants and has numerous health benefits. Add lemon, lime, or orange slices to the iced tea for a zesty flavor that will energize you all summer.
Iced Green Tea with Citrus Recipe
Ingredients:
- 4 cups water
- 4-6 green tea bags or 2 tablespoons loose green tea leaves
- 1 lemon, sliced
- 1 lime, sliced
- 1 orange, sliced
- Ice cubes
- Honey or sweetener of your choice (optional)
Instructions:
- Bring 4 cups of water to a boil in a saucepan.
- Once the water comes to a boil, turn off the heat and add the green tea bags or loose green tea leaves to the water.
- Let the tea steep for about 3-5 minutes, or follow the steeping time instructions provided on the tea package for the best flavor.
- After steeping, remove the tea bags or strain the loose tea leaves from the water, and let the tea cool to room temperature.
- While the tea is cooling, prepare the citrus slices by washing and thinly slicing the lemon, lime, and orange.
- Once the tea has cooled, transfer it to a pitcher or a large jar.
- Add the citrus slices to the pitcher with the tea.
- If you prefer a sweeter iced tea, you can add honey or any sweetener of your choice to the pitcher. Stir well to dissolve the sweetener.
- Fill glasses with ice cubes.
- Pour the iced green tea with citrus over the ice cubes, making sure to distribute the citrus slices evenly.
- Optionally, you can garnish each glass with an extra slice of citrus or a sprig of mint for a pop of color and added freshness.
- Stir the iced green tea gently and serve immediately.
Enjoy your refreshing and citrus-infused iced green tea!
Note: Feel free to adjust the sweetness and citrus flavor according to your taste preferences. You can also experiment with other citrus fruits like grapefruit or add some fresh herbs like basil or mint for different flavor variations.
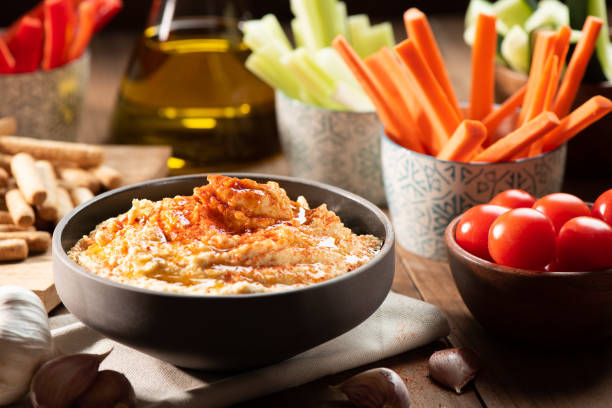
10. Veggie Sticks with Hummus:
For a savory summer treat, opt for veggie sticks paired with homemade hummus. Crunchy cucumber, carrot, bell pepper, and celery sticks are perfect for dipping into a creamy hummus. This healthy treat is made from chickpeas, tahini, lemon juice, and garlic. This satisfying snack is packed with fiber, protein, and healthy fats.
Veggie Sticks with Hummus Recipe
Ingredients:
- Assorted fresh veggies of your choice, such as carrots, cucumbers, bell peppers, celery, cherry tomatoes, broccoli, and radishes, washed and cut into sticks or bite-sized pieces.
- For the hummus:
- 1 can (15 ounces) chickpeas (garbanzo beans), drained and rinsed
- 1/4 cup tahini (sesame paste)
- 1/4 cup freshly squeezed lemon juice
- 2-3 garlic cloves, minced
- 2 tablespoons olive oil
- 1/2 teaspoon ground cumin
- 1/2 teaspoon ground paprika (optional, for added flavor)
- Salt, to taste
- Water, as needed to adjust consistency
Instructions:
- Prepare the veggie sticks by washing and cutting the vegetables into sticks or bite-sized pieces. Arrange them on a serving platter or a large plate.
- To make the hummus, start by draining and rinsing the chickpeas. Reserve a few chickpeas for garnishing the hummus later.
- In a food processor, combine the drained chickpeas, tahini, freshly squeezed lemon juice, minced garlic, olive oil, ground cumin, ground paprika (if using), and a pinch of salt.
- Blend the ingredients until you get a smooth and creamy consistency. If the hummus is too thick, you can add a little water, one tablespoon at a time, to reach your desired consistency.
- Taste the hummus and adjust the seasoning by adding more salt or lemon juice if needed.
- Transfer the hummus to a serving bowl.
- Garnish the hummus with a drizzle of olive oil, a sprinkle of ground paprika, and a few reserved chickpeas.
- Serve the veggie sticks alongside the bowl of hummus.
Enjoy your veggie sticks with hummus as a nutritious and satisfying snack or appetizer. The combination of crunchy vegetables and creamy hummus is sure to be a hit with everyone! You can also customize the veggies and hummus flavors to suit your taste preferences.
With these ten healthy summer treats, you can fully embrace the joys of summer without compromising your health. Whether you’re craving something sweet, icy, or savory, these options will keep you cool, refreshed, and nourished all season long. So go ahead and indulge guilt-free in these delightful summer delights!